
COMPACT DISC PI VERSION: 8. LEVEL: Beginner MAIN TOOLS USED: Gradient Palette Ramp, Palette Ramp Editor, Path Drawing Tool, Path Edit Tools, Continue Draw, Transform Tools/Resize, EasyPalette. TERMS OF USE: Please Read - Thank You! |
|
INSTRUCTIONS |
|
|
|
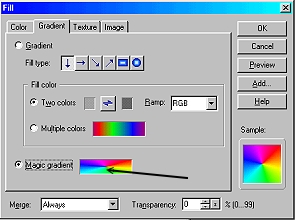
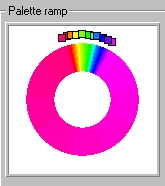
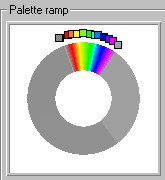
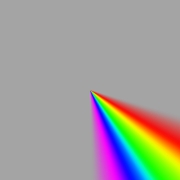
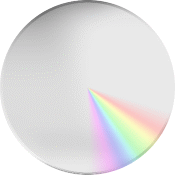
THE RAINBOW EFFECT.... 1. Open a new canvas (any colour), 400W x 400H pixels. 2. Click on Edit/Fill/Gradient and check 'Magic Gradient'. Click on the colour sample to open Magic Gradient box and then on the Edit button under 'Palette Ramp' to open the Palette Ramp Editor. 3. Now move each of the colours up to the top of the Palette Ramp as shown to form a narrow rainbow at the top. To do this - just move your cursor over the little coloured squares until it turns into a + and then move the square to the correct place. 4. Now click on the ring just to the left of the first red box and add a medium grey (Hex #A4A4A4) colour. Do the same to the right of the fuchsia colour in the rainbow (same grey- Hex #A4A4A4). Your Palette Ramp should now look like the one shown. At this stage you can click on the Add button if you want to save this Palette for future use. Click OK. 5. Click OK in the Magic Gradient box. 6. Click OK in the Fill box. 7. Your square should now look like the one shown opposite. 8. This colouring is great - but too gaudy for the CD - so click on Copy and then Paste and drag the copy to a new canvas (white background!) and close the original one.
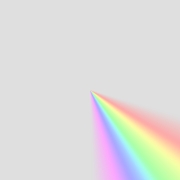
9. Select the copy and Right Click/Properties, set the Transparency to 65% and OK. That's better! 10. Right Click/Merge All and save this pic as rainbow. jpg (at 100%) - somewhere on your hard drive where you can find it when you need it again. OK - we have the extra colouring for the disc - now let's make the disc. |
|
|
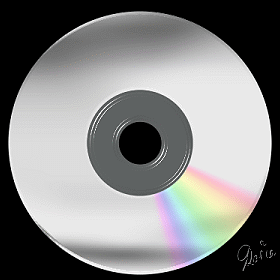
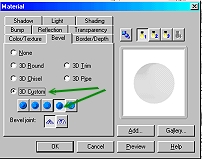
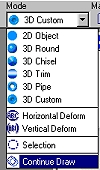
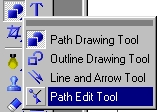
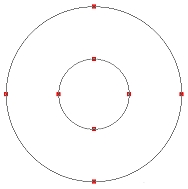
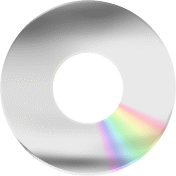
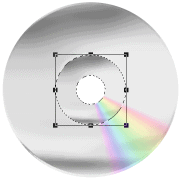
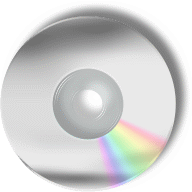
THE DISC 11. Open a new canvas - black or white probably look best - but the CD can be made for any colour background. TIP! I would also recommend that you use a higher resolution than usual when opening this - as the gradients save with a better appearance for web-use. I used 300 d.p.i. for the examples shown here and saved then as gifs in PI8. 12. Using the Path Drawing Tool, Shape - Circle: Color - Grey: Mode - 3D: draw a circle shape 350W x 350H pixels. 13. Open the EasyPalete/Material Attribute Gallery/Metallic and Click on Silver 2. 14. Change the Border and Depth to 6 each in the Path Panel. 15. Click on the Material box/Light tab and change the number of lights to 2 (yes, I know it looks dark - don't worry - that's fine). 16. Click on the Color/Texture tab, check the File button - Browse to the rainbow.jpg you made, select it and Open. That's brightened it up again! 17. Click on the Bevel tab and change the bevel to the Custom Bevel as shown - and OK - to exit the Material box.. Your pic should now look like the one above/opposite. 18. Now change the Mode to Continue Draw and draw another circle 140W x 140H pixels, inside the big circle. It doesn't matter if it's right in the middle at this stage. 19. Now click on the Path Edit Tool. 20. Shift/Click to select both of the circles. 21. Click on Align Center and then Align Middle. 22. Click out of Path Edit Mode and back into 3D Custom. 23. Right Click/Duplicate this piece. Now use the Transform Tools/Resize to make this small enough to fit the exact centre hole of the first piece. 24. Open the EasyPalette/Material Attribute Gallery/Glass. Click on Glass G 24. You can close the EasyPalette now. 25. In the Path Panel - change the Border to 9 and the Depth to 10 for this smaller piece. 26. Select both pieces of the CD. Right Click/Align/Center Both - to ensure that they are accurately positioned. 27. Right Click/Merge as Single Object. 28. You can add a Drop Shadow to the CD (Right Click/Shadow) if you wish - or save your CD object now for future use. You could also try experimenting with gold presets - or even making a label to go on your disc! |
|
|
|
 |
|
|
Free Spirit Graphics If you would then like an invitation to join, please Email Me. We'd love to have you along! |
|
|
If you need any help - or want to make suggestions to improve this tutorial - or for new ones |
|
This site © Rosie Hardman-Ixer 2001/2/3 |