
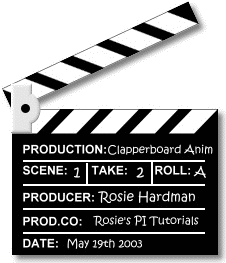
CLAPPERBOARD ANIMATION PI VERSION: 8 (also suitable for PI7). LEVEL: Intermediate (a basic knowledge of the tools required is assumed). MAIN TOOLS USED: Path Drawing Tool, Path Edit Tool, Line & Arrow Tool, Transform Tools, Text Tool, Gif Animator 5. TERMS OF USE: Please Read - Thank You! |
|
INSTRUCTIONS |
|
|
|
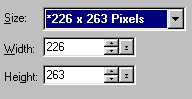
THE BOARD 1. Open a new, white canvas 230W x 260H pixels. 2. Using the Path Drawing Tool, Shape - Rectangle: Color - Black: Mode - 2D: draw a shape 205W x 120H pixels. 3. Above that draw another rectangle 205W x 25H pixels.
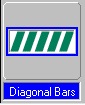
4. Using the Path Drawing Tool, Custom Shape - Diagonal Bars: Color - white: Mode - 2D: draw a shape the height of the smaller, black rectangle.
5. Use the Transform Tools to stretch this until it is the width of the smaller rectangle. 6. Put the white shape in position over the smaller, black rectangle as shown. 7. Select both these pieces and Right Click/Merge As Single Object.
8. Right Click/Duplicate this piece and then use the Transform Tools/Rotate & flip - to flip the piece Vertically.
9. Put both pieces in place on the clapperboard.
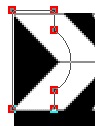
10. Using the Path Drawing Tool, Shape - Rectangle: Color - White: Mode - 3D Round: Border - 5: Depth - 10: draw a shape 25W x 50H pixels. Put in position at the left hand side of the clapperboard for the hinge cover as shown. 11. Now click on the Editing button on the Attribute Toolbar to go into Path Edit Mode. 12. Click on the + button under 'Edit Point' and add two nodes to the right-hand line as shown. 13. Click on the left-hand (Pick Tool) button under 'Edit Point', select the line between the two nodes you created and then, under 'Convert line', click on the curved line. 14. Use the control handles to create the curve shown (don't forget that you can use the Toggle button to check your shape before leaving Path Edit mode). 15. Once you are happy with the shape - click on the Edit button again to go out of Path Edit mode and back into 3D Round. 16. Using the Path Drawing Tool, Shape - Circle: Color - Black: Mode - 3D Round: draw a small circle to complete the hinge cover. 17. Shift/Click to select both pieces of the hinge cover and Right Click/Merge As Single Object. That's all the basic pieces for the board done - now for the lettering etc! |
|
|
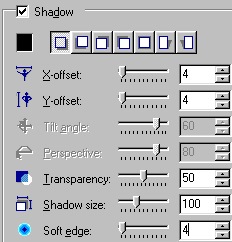
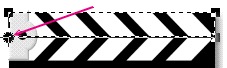
LETTERING & LINES Clapperboards come in many layouts in terms of the written content. Mine is just one suggestion but you may like to change the layout according to the use you have for the finished graphic. I would plan this on paper first. 17. Using the Line & Arrow Tool, draw a white, 2D line across your board and Right Click/Duplicate this as many times as you need. TIP! Don't forget - holding down the Shift button when you are drawing lines constrains them to perfect, straight lines. 18. Put these roughly in place on your board and then Right Click/Align/Left. You can also Right Click/Align/Space Evenly/Vertically if you are really fussy (I am!). 19. Add any vertical lines to your layout. 20. Now add any permanent, heading text in a simple, clean font (I am using Arial on size 12, Bold, White). 21. In the Layer Manager select all parts of the clapperboard EXCEPT the hinge cover and the top clapper. Right Click/Merge As Single Object. Right Click/Arrange/Send to Back. 22. Right Click/Shadow - using the settings shown opposite, Click OK. 23. Select the hinge cover and base of the clapperboard and Right Click/Merge As Single Object. 24. Select the clapper and add the same shadow settings to it. 25. Still keeping this piece selected, click on the Transform Tools/Rotate freely and move the rotation point (the little circle with a cross through it) to the position shown over the bottom left-hand corner. This is vitally important or your animation will not work correctly. NOTE: If you close your ufo file and then reopen it in the future, you will have to RESET this rotation point again before doing the animation section! 25. If you think you might be going to use the clapperboard for a number of different things, save it now as a ufo - either in your EasyPalette or a folder of your choice.
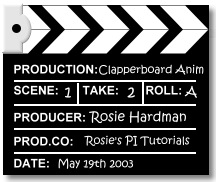
26. Finally add the other text details needed to the board for this particular graphic. A handwriting type font is best for this - I am using Kristen ITC for mine. 27. Once you have all the writing in place you can also merge this with the lower part of the board. OK - let's make the frames and animate! |
|
|
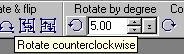
THE FRAMES/ ANIMATION 28. Select the clapper and, using the Transform Tools, set the Rotate by degree to 5 degrees.
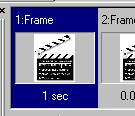
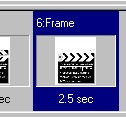
29. Rotate the clapper 5 times to the left, making sure that it is rotating from the hinge correctly. 30. With the clapper in this open position, select ALL parts of your clapperboard and drag them to a new, white canvas. This will ensure that you have the minimum amount of white canvas needed for your animation. 31. Save this as frame1.jpg somewhere you can find it easily. 32. Rotate the clapper back right ONCE by 5 degrees and save as frame2.jpg. 33. Repeat instruction 32 (frame3.jpg, frame4.jpg etc) until you have made 6 frames in all and the clapper is shut. 34. Make a note of the width and height of your frames. 35. Close PI and open Gif Animator and when the Startup Wizard appears click on Animation Wizard. 36. Enter the appropriate width and height for your frames and click Next. 37. Click on Add image and add your frames in reverse order from frame6.jpg - frame1.jpg. Click Open. Click Next. 38. In the next box change the Delay to 1. Click Next. 39. Click Finish. 40. In the frame list at the bottom of the screen, Right Click/Properties on the FIRST frame. 41. Set the delay to 100 and OK. 42. On the LAST frame set the Delay to 250 and OK. 43. Click on File/Optimization Wizard and in the first box make sure 'Yes - Recommended' is checked and click Next. 44. Change the number of colours to 25 and click Next. 45. Leave 'Yes - Recommended' checked in both boxes and click Next. 46. Click Finish. 47. Click on Preview if you wish to check your animation. 48. Click on Save As - and save the animation to your hard drive. |
 |
|
|
Free Spirit Graphics If you would then like an invitation to join, please Email Me. We'd love to have you along! |
|
|
If you need any help - or want to make suggestions to improve this tutorial - or for new ones |
|


This site © Rosie Hardman-Ixer 2001/2/3 |