
CARVED WOOD PI VERSION: 6/7 LEVEL: Beginner MAIN TOOLS USED: Path Tools: Burn Tool: EasyPalette/Effect/Emboss: Text Tool (depending on pattern). NOTE: My THANKS to Susan (TexSusan) for extra input on this tutorial re use of the Properties box to help bring out the grain more effectively. TERMS OF USE: Please Read - Thank You! |
 |
INSTRUCTIONS |
|
|
|
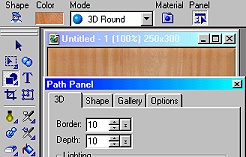
1. CUTTING THE WOOD!... 1. Open a new empty window - I have used one 250 pixels
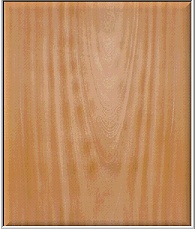
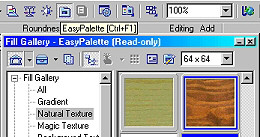
wide x 300 pixels high. 2. Open the Easy Palette. PI7 (Choose a wood with a strong grain as this will look better in the final graphic). You may need to reset the Border and Depth after applying if you are using Fr. Michael's presets. PI6 Close the Easy Palette. 3. Right Click on your picture and Merge the piece of wood with the background. 4. Click on Edit/Duplicate/Base Image Only to produce a second copy of this. |

|
2. MAKING THE PATTERN... 5. Using the Duplicate piece, you now need to apply a 2D pattern in Black. This can be a combination of Path Tool shapes, dingbats, lettering from fonts etc. TIP: Some traced stained glass patterns make also excellent carving patterns!6. Once you are happy with your design, Right Click /Merge All. |
|
|
3. CARVING THE WOOD... 7. Reopen the Easy Palette/ Filter Gallery/Special (PI6) or the Effect Gallery/Special (PI7) - Right Click on Emboss 1and then click on 'Modify Properties and Apply'. 8. Right Click on the Coating Colour and change to a mid-brown. You may have to experiment with the colour palettes here to find an ideal colour - mine was Hex #B4753E. Move the Depth slider to the left, down to 1 or 2 depending on the depth of your pattern. A finer pattern can take a lower number. Click OK. Close the Easy Palette. 9. Right Click/Copy. Go back to your original wood piece and Right Click/Paste. 10. Right Click/Properties - set Transparency at around 50% (or until enough of the wood grain shows through - mine was 55%) and OK. Tip: Sometimes you can get good effects by using various Merge methods from the Properties box - alone or in combination with adjusted Transparency - this varies depending on the wood chosen, the colour used in the Emboss stage and the size of the pattern. 11. Once you are happy with the degree of carving and grain showing through, Right Click/Merge All. It's a good idea to Save your picture at this point in case you get carried away on the next stage and cannot Undo! |
|
| 4. ENHANCING THE CARVING... Our 'carving' doesn't look much yet - but this is where the fun starts! 12. Click on the Retouch/Burn Tool - use a large size to start with - I used the settings shown opposite. 13. First use the Burn tool on the edges of the Rectangle to create depth. 14. Now start to run the Burn Tool lightly over the 'carved' areas of the picture and the lines of the grain. Do this in stages, so that you can Undo where necessary - and DON'T HURRY!. Gradually the carving will start to acquire depth and a more 'real' look. 15. Once you have emphasised all the major lines - switch to a smaller size Burn Tool and start to add depth to individual areas of your pattern. Enjoy your carving! |
|
|
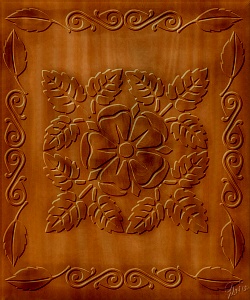
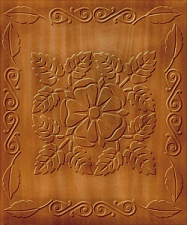
5. YOUR FINISHED CARVING |
 |
|
|
Free Spirit Graphics If you would then like an invitation to join, please Email Me. We'd love to have you along! |
|
|
If you need any help - or want to make suggestions to improve this tutorial - or for new ones |
|

This site © Rosie Hardman-Ixer 2001/2/3 |