
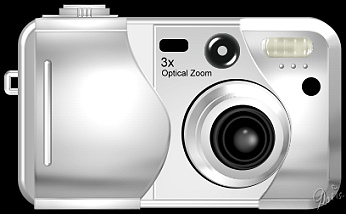
DIGITAL CAMERA PI VERSION: XL/8. LEVEL: Advanced. MAIN TOOLS USED: Path Drawing Tool, Transform Tools, EasyPalette presets, Path Edit, Object Paint Eraser, Paint Tools/Airbrush, Outline Drawing Tool. TERMS OF USE: Please Read - Thank You! |
|
INSTRUCTIONS |
|
|
|
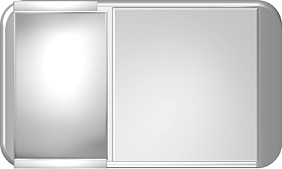
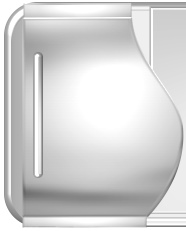
MAIN BODY OF CAMERA 1. Open a new, white canvas, 450W x 300H pixels. 2. Using the Path Drawing Tool, Shape - Rounded Rectangle: Color - grey (Hex#C8C8C8): Mode - 3D Round: Border - 9: Depth - 30: draw a shape 377W x 225H pixels. 3. In the Path Panel/Shape tab change the Roundness setting to 30. 4. In the Material box/Shading tab change the Shading to Metallic and OK. 5. Now draw a second rounded rectangle, same colour, Mode - 3D Round: Border & Depth at Maximum setting: size - 369W x 217H pixels. In the Path Panel/Shape tab change the Roundness setting to 30. 6. In the Material box/Lighting tab, change the number of lights to 3 (all Direct). 7. Using the Transform Tools/Rotate & flip, rotate the shape 90o to the right. 8. Right Click/Convert Object Type/Reset Text/Path Object. 9. Change the Mode of the shape to 3D Trim. 10. Now use the Transform Tools to rotate the shape back 90o to the left. 11. Put the two shapes in place with the bottom right-hand corners together as shown in the first illustration above/left. 12. Using the Path Drawing Tool, Shape - Rectangle: Color - same: Mode - 3D Round: Border - 3: Depth - 30: draw a shape 195W x 207H pixels. 13. In the Material box/Lighting tab, change the second light to Spot. 14. Put the shape in place as shown. 15. Draw another long rectangle - Mode - 3D Trim: Border - 4: Depth - 30: 300W x 9H pixels and put in place at the bottom of the camera as shown. |
|
|
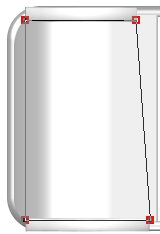
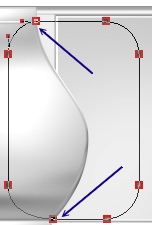
LENS COVER - 1 16. Draw 3 more rectangles, Mode - 3D Round Color - EasyPalette/Material Attribute Gallery/Metallic/Silver 2: in the following sizes and Borders/Depths: Rectangle 1 - 110W x 14H pixels (Border - 2: Depth - 20) 17. Put the three rectangles in place at the left-hand side of the camera as shown (Right Click/Align/Left to be sure of perfect alignment).
18. Select the larger, middle rectangle and then click on the Editing button to go into Path Edit mode.
19. Move the top, right-hand node to the left to meet the corner of the small rectangle above.
20. Select the right-hand side line of the rectangle and click on the 'Convert line segment to curve' button on the Attribute Toolbar.
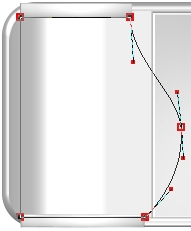
21. Click on the + (plus) sign under 'Edit point' on the Attribute Toolbar and add a node where shown.
22. Use the control handles to create the curve illustrated.
23. Click out of Path Edit mode and your lens cover should look like the one illustrated opposite.
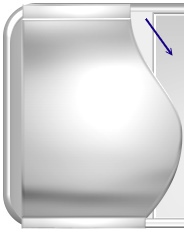
24. Select the rectangle to the right of the lens cover - indicated with an arrow in the picture opposite (this selects the appropriate preset for us to use).
25. Using the Path Drawing Tool, Shape - Rounded Rectangle: Border - 5: Depth - 30: draw a small shape, 10W x 125H pixels and put in place on the lens cover.
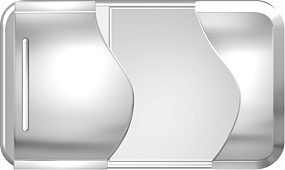
26. If you are happy with the lens cover, select all four pieces of it and Right Click/Merge As Single Object. OK - now we need the right-hand side of the cover to match..... |
|
|
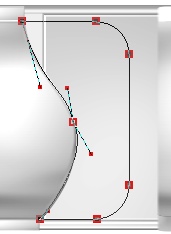
LENS COVER - 2 27. Using the Path Drawing Tool, Shape - Rounded Rectangle: Color - EasyPalette/Material Attribute Gallery/Metallic/Silver 2: Mode - 3D Chisel: Border - 15: Depth - 30: draw a shape 150W x 225H pixels. 28. In the Path Panel/Shape tab change the roundness to 53. Put in place as shown.
29. Right Click/Convert Object Type/From Text/Path to Image.
30. Use the Object Paint Eraser (set on Straight Lines and holding down the Shift key to contrain the line) to remove the left-hand part of this shape up to the beginning of the curve as shown.
31. Now draw another Rounded Rectangle, Mode - 3D Round: Border - 3: Depth - 20: size - 130W x 195H pixels. 32. In the Path Panel/Shape tab change the roundness to 55. Put in place as shown. Now we need to create a curve that matches the one on the left, so I would recommend moving the piece you just created over to the left hand side before going into Path Edit. This way you can use the shape underneath to help to form your curve.
33. Once the piece is in place, click on the Editing button to go into Path Edit and then move the two nodes to the positions indicated by the arrows left.
34. Click on the - (minus) sign under 'Edit point' and delete one of the two nodes on the left hand line.
35. Move the remaining mode on that line to the position shown and then use the control handles to produce a curve to match the one beneath. Once you are happy with this, exit Path Edit mode. 36. Reposition the piece on the camera and use Path Edit to make any final adjustments to the rounded corners etc so that they match those on the shape below. 37. Finally, use the Object Paint Eraser to remove any excess from the shape beneath. The result should look like that illustrated opposite. 38. Select both pieces you have just made and Right Click/Merge As Single Object. |
|
|
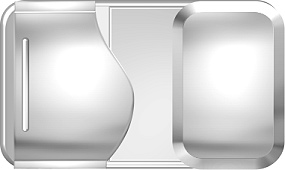
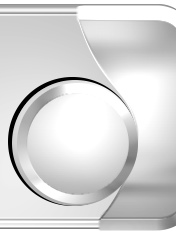
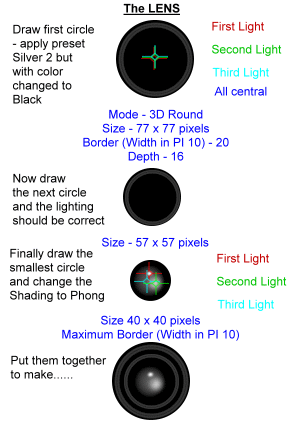
ZOOM LENS 39. Using the Path Drawing Tool, Shape - Circle: Color - Black: Mode - 2D: draw a shape 128W x 128H pixels and put in place. 40. Draw a second circle, Mode - 3D Round: Border - 1: Depth - 1: 125W x 125H pixels and fill with the EasyPalette/Material Attribute Gallery/Metallic/Silver 2 preset. Put in place. 41. Draw a third circle, Color - same preset: Mode - 3D Chisel: Border - 13: Depth - 30: 120W x 120H pixels and put in place (slightly offset to the bottom/right). Your camera should now look like the picture opposite. 42. Draw a fourth circle, Color - same: Mode - 3D Chisel: Border - 6: Depth - 25: 107W x 107H pixels and put in place.
For the lighting of the next few pieces, see my detailed instructions, left.
43. Draw a fifth circle, Color - Retain the preset but change color to Black: Mode - 3D Round: Border - 20: Depth -16: 77W x 77H pixels and put in place. 44. Follow the lighting instructions on the left to create the impression of depth shown in the pictures opposite. 45. Now add another circle 57W x 57H with the correct lighting and put in place. 46. Finally draw a small circle 40W x 40H pixels - open the Material box/Shading and change this to Phong and create the correct lighting shown left. Put in place. Your camera lens should now look something like that illustrated left. |
|
|
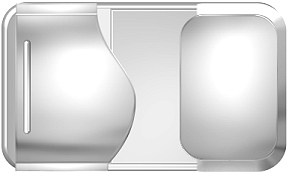
FLASH FITTINGS 47. Using the Path Drawing Tool: Shape - Rounded Rectangle: Color - Beige (Hex#D8D6BF): Mode 2D: draw a shape 57W x 25H pixels. 48. Right Click/Duplicate. 49. Using the first of the two shapes, Right Click/Convert Object Type/From Text/Path to Image and with the Paint Tools/Airbrush (color - Hex#2E2D1D) paint a few lines across the shape. 50. Using the Duplicate copy, change the Mode to 3D Round: Border - 8: Depth - 19. 51. Open the EasyPalette/Material Attribute Gallery/Glass and apply preset G23. 52. From the Bump Gallery apply preset M13 - then use the lightbulb in the Path Panel to get the lighting shown opposite by moving the cursor towards the top left-hand corner of the shape. 53. Now click on the back piece of the camera (the first one you made) to establish the preset you want and use the Path Drawing Tool to draw three small circles and put in place on the camera beneath the flash. 54. Finally add a black, 2D circle as shown. |
|
|
VIEWFINDER ETC. 55. Using the Path Drawing Tool, Shape - Circle: Color - Black: Mode - 2D: draw a shape 40W x 40H pixels. 56. Using a pale grey colour, draw a small circle 11W x 11H pixels. 57. Select the black circle and Right Click/Duplicate. 58. Change the Mode to 3D Round. Open the EasyPalette/Material Attribute Gallery/Glass and apply the G23 preset. 58. In the Path Panel change the Border to 10, Depth - 30. 59. Select all three circle shapes and Right Click/Align/Center Both. Right Click/Merge As Single Object and put in place on the camera. 60. Add a small, black, 2D rounded rectangle and some text as shown. |
|
|
SHUTTER/NECKSTRAP HOLDER 61. Using the Path Drawing Tool: Shape - Rectangle: Mode - 3D Round: Border - 3: Depth - 30: draw a shape 90W x 5H pixels and put in place on camera. 62. Fill this with preset Silver 2 from the EasyPalette/Material Attribute Gallery/Metallic. 63. Draw a second rectangle, 60W x 9H pixels and put in place. I would recommend opening the Material box/Light and lowering the Ambient light setting to make this piece a little darker. 64. Draw a third rectangle, Border - 2: Depth - 30: 50W x 5H pixels and put in place. 65. Finally add three tiny rectangles as shown. 66. Once you have all these pieces in place, select them all and Right Click/Merge As Single Object. 67. Using the Outline Drawing Tool, Shape - Rounded Rectangle: Mode - 3D Round: draw a shape 20W x 20H pixels. In the Path Panel/Outline change the Width setting to 4. 68. Put the resulting shape at the left-hand side of the camera and Right Click/Arrange/Send to Back. Put in place for the neck-strap holder. ... and there's your camera ready to go! |
 |
|
|
Free Spirit Graphics If you would then like an invitation to join, please Email Me. We'd love to have you along! |
|
|
If you need any help - or want to make suggestions to improve this tutorial - or for new ones |
|


This site © Rosie Hardman-Ixer 2001/2/3 |