
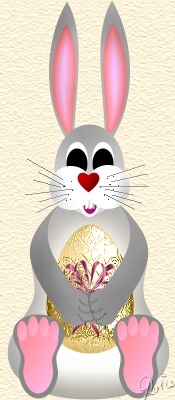
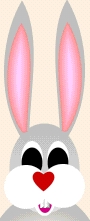
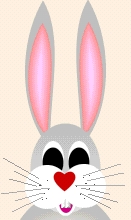
EASTER RABBIT PI VERSION: 6/7. LEVEL: Intermediate - a working knowledge of the Path, Transform and Painting Tools is assumed MAIN TOOLS USED: Path/Path Edit Tools: Transform Tools: Paintbrush: Object Paint Eraser: EasyPalette: Burn Tool NECESSARY DOWNLOADS: Download egg-shape ufo here if you need oneJoined-Circles Shape for PI6 Users TERMS OF USE: Please Read - Thank You! |
 |
INSTRUCTIONS |
|
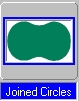 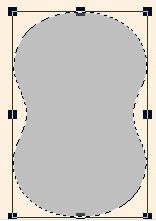  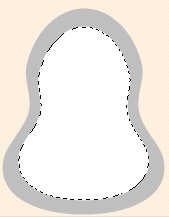  |
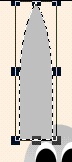
RABBIT'S BODY 1. Download the egg shape-ufo if you don't have an egg shape in your Path Shapes. Open a new canvas approximately 220W x 400H pixels. (PI6 Users - download joined circles shape provided and make 2 copies of this before proceeding) Using Path Tools: Shape - Joined Circles: Colour - Medium Grey: Mode 2D - draw a shape approximately 210W x 130H pixels. 2. Using the Transform Tools/Rotate and Flip - Rotate this shape to the left or right through 90 degrees.
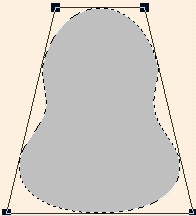
3. Using the Transform Tools/Perspective - use the tool to narrow the top of body and widen the bottom as shown.
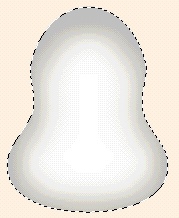
4. Right Click and Duplicate this piece then use the Transform Tools/Resize to make the piece smaller and change the colour to white.
5. Right Click and Convert Object Type/From Text/Path to Image.
6. Right Click/Properties and set the Soft Edge to 30. Click OK.
7. Right Click/Select All Objects and Merge As Single Object. |
 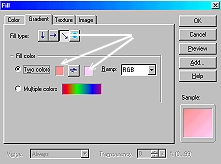  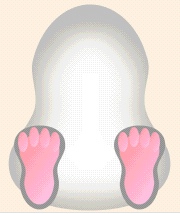 |
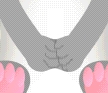
RABBIT'S FEET 8. Using Path Tools: Shape - Joined Circles: Colour - Darker Grey: Mode 2D - draw a shape approximately 84W x 50H pixels. 9. Using the Transform Tools/Rotate and Flip - Rotate this shape to the left or right through 90 degrees. 10. Using the Transform Tools/Perspective - use the tool to narrow the bottom of the foot and widen the top as shown. 11. Right Click and Duplicate this piece then use the Transform Tools/Resize to make the piece smaller and change the colour to to the gradient shown. 12. Using the Path Tools: Shape - Ellipse: Colour - same pink gradient as the sole of the foot: draw a small ellipse as shown. 13. Right Click and Duplicate this three times and put in place on foot as shown. 14. Now Shift/ Click on each of the six parts of the foot - Right Click and Merge As Single Object. 15. Right Click and Duplicate this piece and put both feet in place on body. |
 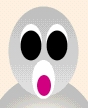 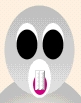 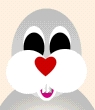 |
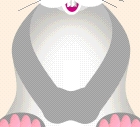
RABBIT'S HEAD - FACE 16. Using Path Tools: Shape - Ellipse: Colour -Medium Grey: Mode 2D - draw a shape approximately 70W x 90H pixels as shown. 17. Using the Path Tools: Shape - Ellipse: Colour - white: draw three more shapes for mouth and eyes. 18. Using the Path Tools: Shape - Ellipse: Colour - black: draw two more shapes for eyes and one pinky-red one for the tongue 19. Using the Path Tools: Shape - Rectangle: Colour white: Mode 3D draw a small, narrow rectangle for the Rabbit's tooth. Right Click/Duplicate this piece and put in place on the face.20. Using the Path Tools: Shape - Circle: Colour - white: draw two more shapes for cheeks. 21. Using the Path Tools: Shape - Heart: Colour - red: draw a shape for the nose. |
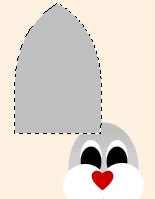     |
RABBIT'S HEAD - PART 2 - EARS
22. Using the Path Tools: Shape - Arch 2: Colour -Medium Grey: draw a shape as shown.
23. Now use the Transform Tools/Resize to narrow this shape.
24. Now click on the Path Edit Tool and use this to narrow the bottom of the ear by dragging the two small square inwards and using the adjustment handles to widen the centre of the ear - until you get the shape shown.
25. Return to 2D Mode.
26. Right Click and Duplicate this piece then use the Transform Tools/Resize to make the duplicated piece smaller and change the colour to the pink gradient shown.
27. Shift Click on both pieces of the ear and Right Click/Merge As Single Object.
28. Right Click/Duplicate the ear - then use the Transform Tools/Rotate and Flip to flip the second ear horizontally and put both ears in place.
29. Select both ears and then Right Click/Arrange/Send to Back.
Put in place behind head |
 |
RABBIT'S HEAD - FINISHING TOUCHES 30. Using the Paint Tools/Paintbrush - Shape - Size 1: Colour - Black: Click on Mode button to go into Paint As Object Mode: paint some dots on the rabbit's cheeks. 31. Using the Line and Arrow Tool: Colour - Dark Grey: Mode - 3D: In the Path Panel change the Outline Width to Hairline: draw in the whiskers as shown. |
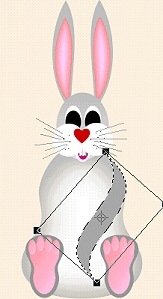 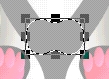   |
RABBIT'S ARMS
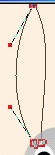
32. Using the Path Tool: Shape - Wave 1: Mode - 2D: Colour - Medium Dark Grey: draw a shape approximately 140W x 107 H pixels. 33. Use the Transform Tool/Rotate Freely to rotate this into the position shown. 34. Right Click/Duplicate this shape and then use the Transform Tools/Rotate and Flip to flip the piece horizontally. Put second arm in position. 35. Select both arm pieces and Right Click/Merge As Single Object. 36. Using Path Tools: Shape - Joined Circles: Colour - Darker Grey: Mode 2D - draw a shape approximately 60W x 35H pixels for the paws. Put in place as shown 37. Now select the arm piece and, using the Object Paint Eraser Tool, erase the part of the arm section below the paws.
38. Select the arms and paws and Right Click/Merge As Single Object.
39. Using the Paint Tools/Paintbrush - on the settings shown opposite - click on Mode button to go into Paint As Object Mode: paint in the details of the rabbit's paws. |
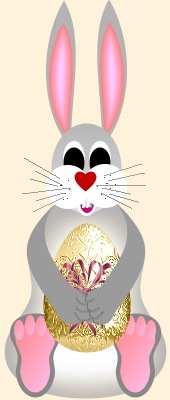 |
EASTER EGG 40. Use the egg-shape provided (or an egg-shape from your Path Shapes, if you have one, to draw a 3D egg) and use any preset from your EasyPalette to fill your egg. 41. Add a bow or any other decoration of your choice to your egg. 42. Select the egg and decoration and Right Click/Merge As Single Object. 43. Right Click/Arrange/Send Backwards to send behind the paws. 44. Finally - use the Retouch Tools/Burn Tool to shade any parts of the body you wish to add extra depth to. You will need to convert any Path Shapes into Images when prompted before you can do this. |
|
|
|
|
|
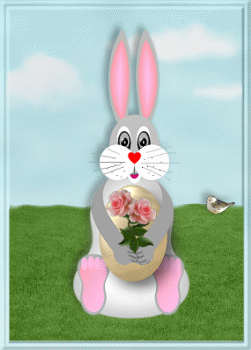
A lovely version of the tutorial by Thanks for this Sue! |
 |
|
|
Free Spirit Graphics If you would then like an invitation to join, please Email Me. We'd love to have you along! |
|
|
If you need any help - or want to make suggestions to improve this tutorial - or for new ones |
|
This site © Rosie Hardman-Ixer 2001/2/3 |