
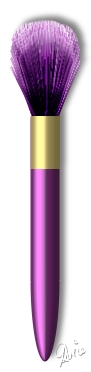
MAKE-UP BRUSH PI VERSION: 7/8/XL. LEVEL: Beginner MAIN TOOLS USED: Path Drawing Tool, Line & Arrow Tool, Transform Tools, Retouch Tools (Burn & Dodge), Object Paint Eraser. TERMS OF USE: Please Read - Thank You! |
|
INSTRUCTIONS |
|
|
TOOL ICONS FOR BEGINNERS
|
|
|
|
THE HANDLE 1. Open a new, white canvas, 200W x 400H pixels. 2. Using the Path Drawing Tool, Custom Shape - Arch 3: Color - any you like, mine was purple, Hex#5B1559: Mode - 3D Round: Border - 99: Depth - 30: draw a shape 30W x 45H pixels. 3. Using the Transform Tools/Resize stretch the shape until it measures 30W x 245H pixels. 4. Use the Transform Tools/Rotate & flip to flip the shape Vertically. 5. Click on the Material box/Shading tab and change the shading to Metallic. 6. Under the Lighting tab change the number of lights to 2 (both Direct) and OK. 7. In the Path Panel/3D tab, click on Light No.2 and then on the lightbulb icon underneath. 8. Move the light to the position shown to create the light on the left-hand side. 9. Now use the Rectangle Shape: Color - Gold (Hex#F5CF5C): Mode - 3D Trim: Border - 16: Depth - 30: to draw a shape 53W x 30H pixels. 10. Use the Transform Tools/Rotate & flip to flip the shape 90o to the left and put the piece in place at the top of the handle. OK - that's the handle.... now onto the bristles! |
|
|
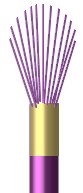
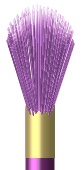
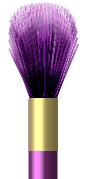
THE BRISTLES 11. Using the Line & Arrow Tool - Straight Lines: Color - any you like, mine was lighter purple, Hex#AC4DC4: Mode - 3D Round: Border - 1: Depth - 30: draw the first set of lines as shown. Try to create a curve at the top as illustrated. It does NOT matter if your bristles come down over the gold piece as we're going to Send To Back when we've finished them.
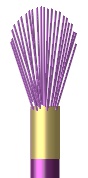
12. Now fill in the gaps with more bristles. 13. Select ALL the bristles and Right Click/Merge As Single Object.
14. Select the set of bristles and Right Click/Duplicate this object and use the Transform Tools/Rotate & flip to flip it Horizontally. 15. Put the two sets of bristles together with the second set very slightly below the first - then select them both and Right Click/Merge As Single Object. Duplicate this object and put the duplicate to one side for the moment.
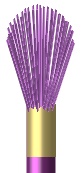
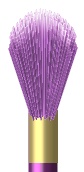
16. Back on the original set of bristles, use the Retouch Tools/Dodge on the settings shown opposite, to lighten the tops of the bristles as shown.
17. Right Click/Duplicate the lightened bristles and use the Transform Tools/Rotate & flip to flip the duplicate Horizontally. 18. Use the Transform Tools/Resize to narrow this set of bristles slightly and put in place slightly below the first set (see left).
19. Select both sets of bristles and Right Click/Merge As Single Object. 20. Right Click/Duplicate the bristles and use the Transform Tools/Rotate & flip to flip the duplicate Horizontally. Put in place over the first set to form a solid looking brush.
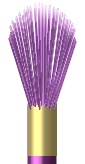
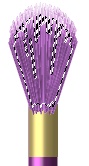
21. Now bring the spare set of bristles you put to one side in instruction 15 and use the Retouch Tools/Dodge to lighten the tops again - but NOT AS MUCH as you did the previous time. Use the Transform Tools/Resize to make this set of bristles smaller and put in place as shown opposite.
22. Use the Retouch Tools/Burn on the settings shown left to darken the area illustrated.
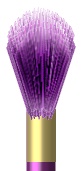
23. Right Click/Duplicate this smaller set of darkened bristles and use the Transform Tools/Resize to make this smaller again and add to the brush. 24. Now select ALL the bristles and Right Click/Merge As Single Object. 25. Use the Retouch Tools/Dodge to darken the lower part of the bristles where they will fit into the handle. 26. Right Click/Arrange/Send to Back. 27. I added one or two extra 'stray' bristles to the sides of the bristle group at this point - lightening the tops slightly and darkening where then went into the handle - but you may choose not to do this. 28. Finally, you may wish to neaten the shape of your brush top - in which case use the Object Paint Eraser to tidy up the top line of the bristles. |
|
|
|
 |
|
|
Free Spirit Graphics If you would then like an invitation to join, please Email Me. We'd love to have you along! |
|
|
If you need any help - or want to make suggestions to improve this tutorial - or for new ones |
|
 - Retouch Tools/Dodge & Burn

This site © Rosie Hardman-Ixer 2001/2/3/4 |