BARBER'S POLE PI VERSION: 8 (also suitable for 7) + Gif Animator. LEVEL: Advanced MAIN TOOLS USED: TERMS OF USE: Please Read - Thank You! |
|
INSTRUCTIONS |
|
|
|
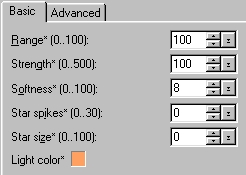
THE OUTER CASE & LIGHT 1. Open a new canvas, 100W x 350H pixels with a dark background. 2. Using the Path Drawing Tool, Shape - Rectangle: Colour - white: Mode - 3D Round: Border - 17: Depth - 30: draw a shape 60W x 205H pixels. NOTE: If you cannot set the Border at 17 before drawing the shape - draw it first to the correct size and you will find you can then set the Border to the required number. 3. Open the EasyPalette/Material Attribute Gallery/Glass and fill this shape with Grey Glass preset, G23. 4. In the Path Panel/3D tab/Lighting - use the Light Bulb to move the light to the edge of the shape as shown in the 1st illustration opposite. 5. Using the Path Drawing tool, Shape - Rounded Rectangle: Mode - 3D Round: Border - 10: Depth - 30: draw a shape 60W x 30H pixels and fill this with preset Silver 1 from the EasyPalette/Material Attribute Gallery/Metallic. 6. Draw a second, smaller one, 65W x 10H pixels. Put the two silver pieces in place as shown over the ends of the glass rectangle. 7. Shift/Click to select both the silver pieces and then Right Click/Merge As Single Object. 8. Right Click/Duplicate. 9. Using the Transform Tools/Rotate & flip - flip the Duplicate Vertically and put in place. 10. Using the Path Drawing tool, Shape - Rounded Rectangle: Color - white: Mode - 3D Round: Border - 6: Depth - 20: draw a shape 40W x 10H pixels. NOTE: To get a pure white colour, in the EasyPalette/Material Attribute Gallery/Metallic or Glass, click on Remove Material - then change the Color setting to white. 11. Right Click/Arrange/Send to Back. 12. Using the Circle Shape (same colour) draw a shape for the light - 60W x 60H pixels. 13. Right Click/Arrange/Send to Back. 14. Shift Click/to select both white pieces, then Right Click/Merge As Single Object. 15. Keeping the lamp selected, open the EasyPalette/Lighting Gallery/Light Bulb/Light Bulb 1. Right Click/Modify Properties and Apply. With the Ambient Light set at 90%, use the settings shown and OK. 16. Right Click/Select All Objects - then Right Click/Merge As Single Object. Your light should now look something like the one shown opposite. 17. (Optional Bracket) I have now added a rectangle with an added wood preset and two small silver ellipses (I used Silver 2 from the Material Attribute Gallery), to make a bracket for my pole. If you do this, it is a good idea to convert the wooden rectangle to an image object (Right Click/Convert Object Type/From Text/Path to Image) and use the Retouch Tools/Dodge to lighten the top of the wood behind the light. Remember - it is all the little details that add reality to your pictures! OK - now onto the red and white moving part! |
|
|
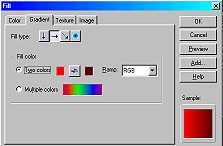
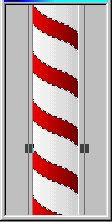
PIECES FOR ANIMATION 18. Now open a new, white canvas - 60W x 316H pixels. 19. Using the Path Drawing Tool - Custom Shape - Wave 1: Color - red: Mode - 2D: draw a shape and then use the Transform Tools/Resize to make it 70W x 70H pixels (don't worry, it is supposed to be wider than the canvas at this point!). 20. Now use the Transform Tools/Rotate & flip to flip it Horizontally. 21. Now use the Transform Tools/Rotate by Degree to rotate it 15 degrees to the right. 22. Right Click/Duplicate this piece 5 times. 23. Arrange these on your canvas as shown. NOTE: In order to ensure accuracy, Right Click/Select All Objects - then Right Click/Align/Center Horizontally. Now Right Click/Align/Space Evenly/Vertically - ensure that 'Even (fix objects on both ends) is checked and OK. 24. Keeping all the red shapes selected, Right Click/Merge As Single Object. 25. Click on Edit/Fill/Gradient and fill this object with a right to left, bright red to dark red, two color gradient fill (I have used Hex#FF0000 to Hex#460000) as illustrated. 26. Open another new, white canvas, 45W x 210H pixels. 27. Click on Edit/Fill/Gradient and fill this canvas with a right to left, white to grey, two color gradient fill (I have used white to Hex#C8C8C8). 28. Now drag the striped red object to this smaller canvas so that it's top is in the position shown (you can close the canvas you made it on now). NOTE: It is a good idea to save this canvas as a separate ufo in case you go wrong and need it again later! 29. Right Click/Merge All - then Right Click/Copy. 30. Click back on the original canvas and Right Click/Paste. (Don't worry about the position of this object yet). 31. Back on the striped canvas click on Undo until the red stripe is active again and tap the UP Arrow key on your keyboard 11 times to move the red shape upwards 11 pixels. 32. Right Click/Merge All - then Right Click/Copy. 33. Click back on the original canvas and Right Click/Paste. (Don't worry about the position of this object yet). 34. Repeat Instructions 31, 32 and 33 twice more. You should now have 4 red and white striped pieces on your original canvas. 35. Select all four of these pieces (best done in the Layer Manager) and then Right Click/Align/Center Both to ensure that they are perfectly lined up. 36. Move them to the correct place on the canvas and then Right Click/Arrange/Send Backwards to position behind the glass. 37. OK that's the main part of the work done - let's save it as pole.ufo and go and animate! |
|
|
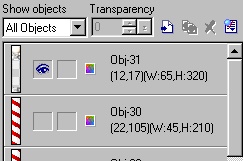
FIRST ANIMATION 38. Close PI and open Gif Animator 5. 39. When the Startup Wizard opens click on 'Open an existing image file'. Browse to the pole.ufo you just saved, select it and click on Open. 40. Now click on the Duplicate Frame button at the bottom of the screen three times. 41. Click on Frame 1 in the list at the bottom of the screen and, in the Object Manager Panel on the right-hand side of the screen, click on the eye icon for the TOP striped object to close it (see left). 42. Click on Frame 2 in the list and close the top TWO striped object eye icons to close them. 43. Click on Frame 3 and close the top THREE striped object eye icons. 45. Shift/Click to select all four frames and Right Click/Properties. Change the Delay to 20 and OK. 46. This image is a bit large for normal use - so let's resize. Click on Edit/Resize Image and in the box that pops up choose Percent (under 'Unit') and put 75 in both number boxes and OK. 47. Click on the Optimise Tab and under Preset choose Photo 256 and save the animation to your hard drive somewhere you can find it. 48. You COULD choose to leave your animation there - but below are a couple of finishing touches you might like to add! |
|
|
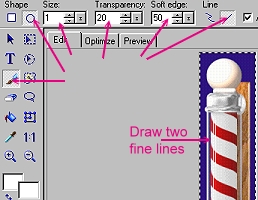
LIGHT REFLECTIONS & FLASHING LIGHT 49. Open the animation you just saved in Gif Animator (so that you are working with the frames of the saved animation NOT the ufo!). 50. Select Frame 1. In the Object Manager Panel, select the object with the open eye icon. 51 Now select the Paintbrush tool and, using the settings shown opposite, paint two lines as shown.
52. Now select Frame 3, select the object in the Object Manager Panel and paint two more lines as shown. These lines will give the impression of the light catching the turning section when the picture is animated.
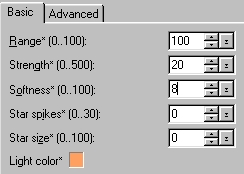
53. How about a flashing light? Yes? - OK - highlight ANY frame you like and then click on the button that takes you into your Favourite Image Editor (PI of course!) This will open that frame in PhotoImpact. 54. Click on the picture to select it. 55. Open the EasyPalette/Lighting Gallery/Light Bulb/Light Bulb 1. Right Click/Modify Properties and Apply. 56. Set the Ambient Light at 100% and use the settings opposite - in the Preview pane move the light up to the globe and OK. 57. Click on the Save button and this will take you back into Gif Animator. 58. Click Yes in the 'Update from Favourite Image Editor' box that comes up. 59. Click on the Optimise Tab and under Preset choose Photo 256 and save the animation to your hard drive somewhere you can find it. Now there's a classy sign to attract customers! - anyone for a shave or haircut? |
 |
|
|
Free Spirit Graphics If you would then like an invitation to join, please Email Me. We'd love to have you along! |
|
|
If you need any help - or want to make suggestions to improve this tutorial - or for new ones |
|
This site © Rosie Hardman-Ixer 2001/2/3 |


