
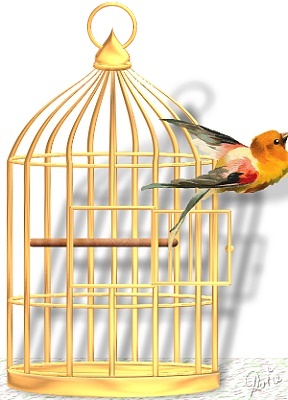
BIRDCAGE PI VERSION: 8. LEVEL: Intermediate (some experience with the Path/Path Edit Tools is advisable). MAIN TOOLS USED: Path Drawing Tool, Path Edit, Transform Tools, Outline Drawing Tool, Line & Arrow Tool, Object Paint Eraser, EasyPalette (for presets). TERMS OF USE: Please Read - Thank You! |
|
INSTRUCTIONS |
|
|
|
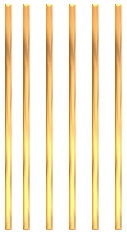
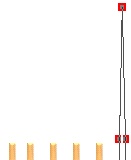
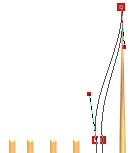
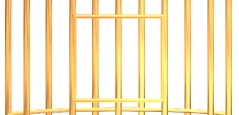
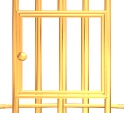
VERTICAL BARS 1. Open a new, white canvas 300W x 415H pixels. 2. Using the Path Drawing Tool, Shape - Rectangle: Color - Gold: Mode - 3D Round: Border - 3: Depth - 30: draw a shape 5W x 215H pixels. Fill this shape with any metallic preset of your choice. 3. Click on the Editing button to go into Path Edit Mode. It helps Zoom in to 200% at this point. 4. Click on the + sign under 'Edit point' and add a central node to the top line of the rectangle as shown in the first picture opposite. Click back on the Pick Point under 'Edit Mode' again. Click out of Path Edit and back into 3D Round mode again. (Return to 100% zoom if preferred). 5. Right Click/Duplicate this shape 5 times. 6. Line up the six shapes as shown opposite and then Right Click/Align/Top. Right Click/Align/Space evenly/Horizontally (ensure that 'Even - fix objects on both ends' is checked) - OK. Now move the far left bar slightly closer to its neighbour (this will be important for perspective). 7. Select the right hand shape and click on the Editing button. Zoom in again to 200% if this helps. 8. Drag the top central node upwards to the point shown. 9. Click out of Path Edit Mode and back into 3D Round. (Your shape should now be approximately 5W x 360H pixels). 10. Click on the next shape left to select it. Click on the Editing button again to go back into Path Edit Mode. 11. Drag the top central node upward to the same point. 12. Click on each of the top lines and under 'Convert Line' click on the Curved line. Use the control handles to create a gentle curve as illustrated. Your shape should now look like the picture above/opposite.
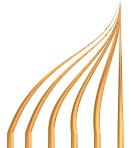
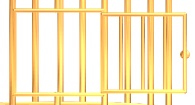
13. Repeat instructions 10 to 12 with each of the shapes to produce the picture shown opposite.
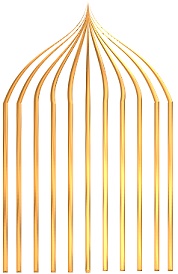
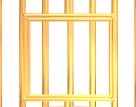
14. Shift/Click to select all the lines and Right Click/Duplicate - then use the Transform Tools/Rotate & flip - to flip the duplicate Horizontally. Put in place as shown over the first set. (YES - you should have two central lines on top of one another!). |
|
|
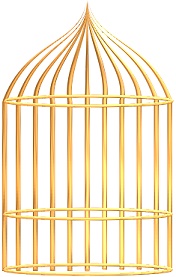
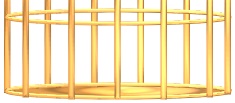
BASE ETC 15. Using the Outline Drawing Tool, Shape - Ellipse: Color - same preset: Mode - 3D Round: Border - 2: Depth - 30: draw a shape - wide enough to just stretch from side to side of the cage at the point shown x 10H pixels.
16. Right Click/Duplicate this shape twice and put in place on the cage as shown.
17. Using the Path Drawing Tool, Shape - Ellipse: Color - same preset: Mode - 3D Round: Border - 6: Depth - 20: draw a shape the same size as the bottom outline ellipse. 18. Right Click/Arrange/Send to Back.
19. Now - Shift/Click to select the six vertical bars illustrated and Right Click/Arrange/Bring to Front.
Be sure to get the correct ones here or the prespective will be wrong on your cage!
20. Select each of those six bars in turn and use the Transform Tools/Resize to make sure the vertical bars come down to edge of the outline ellipse at the front. 21. Select each of the remaining bars in turn and using the same method shorten them so that they lie behind the ellipse at the back (be sure to include that duplicate of the central bar which is hidden at the back.... you can select this in the Layer Manager - or just move the front one out of the way temporarily so you can get at it). The result should be like the illustration on the left. 22. Using the Path Drawing Tools, Custom Shape - Plaque 5: Color - same preset: Mode - 3D Round: Border - 4: Depth - 20: draw a small shape. 23. Using the Transform Tools/Rotate & flip - flip the shape Vertically. 24. Using the Transform Tools/Resize stretch the shape to the same width as the cage. 25. Click on the Editing button to go into Path Edit mode. 26. Use the adjustment (control) handles to make the shape fit the curve of the ellipse at the bottom of the cage. Make sure that you also alter the bottom line so that it runs parallel to the upper one (see illlustration). |
|
|
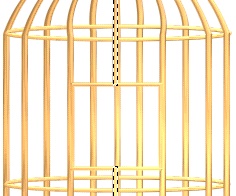
THE DOOR 27. Door Frame: 28. Select the vertical bar illustrated and Right Click/Convert Object Type/From Text/Path to Image.
29. Use the Object Paint Eraser to erase the part of the bar that goes through the door frame. 30. Now select each of the central vertical bars and slightly offset them from one another (select each one and use the Arrow keys to move them apart one pixel so you can see them both).
31. Door: 32. Using the Transform Tools/Resize, reduce the size of the door so that it fits inside the frame - mine is 80W x 58H pixels. 33. Move this door to its own canvas for a moment and, using the Line & Arrow Tool, Shape - Straight Line: Color - same preset: Mode - 3D Round: Border - 2: Depth - 20: draw three lines as shown. 34. Select all these lines and Right Click/Arrange/Send to Back. 35. Right Click/Select All Objects - then Right Click/Merge As Single Object. You need to decide at this point whether you want an open or closed door on your cage. If you are going to have an open door - go to instruction 38 now. 36. Closed Door: Using the Path Drawing Tool, Shape - Circle: Color - same preset: Mode - 3D Round: draw a small shape for the door knob. 37. Merge this shape with the rest of your door and move this back into place on your birdcage. 38.Open Door: Using the Path Drawing Tool, Shape - Circle: Color - same preset: Mode - 3D Round: draw a small shape for the door knob. 39. Right Click/Arrange/Send to Back and put in place as shown behind the right hand side of the door. 40. Right Click/Select All Objects - then Right Click/Merge As Single Object. 41. Put your open door in place on the birdcage as shown. |
|
|
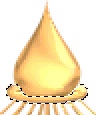
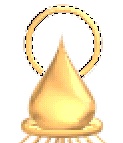
THE TOP 42. Using the Path Drawing Tool, Custom Shape - Raindrop: Color - same preset: Mode - 3D Round: Border - 50: Depth - 30: draw a shape at the top of the cage as shown. 43. Using the Outline Drawing Tool, Shape - Ellipse: Color - same preset: Mode - 3D Round: Border - 2: Depth - 30: draw a shape as shown. 44. Right Click/Convert Object Type/From Text/Path to Image and then use the Object Paint Eraser to erase the section of the ellipse illustrated. 45. Using the Outline Drawing Tool: Shape - Circle: Color - same preset: Mode - 3D Round: Border - 2: Depth - 20: draw a hanging ring 45W x 45H pixels. 46. Right Click/Convert Object Type/From Text/Path to Image and then use the Object Paint Eraser to erase the lower section of the ring illustrated. OK - that's the main part of your cage finished - just the perch to go! |
|
|
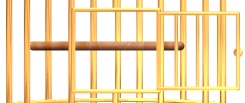
THE PERCH 47. Using the Path Drawing Tool, Shape - Rounded Rectangle: Color - any wood preset: (Border and Depth will depend on the wood preset you choose - mine was Border - 6: Depth - 9:) - draw a shape to stretch between the two vertical bars you have chosen for the position of your perch. 48. Use Right Click/Arrange/Send Backward - or hold down the Alt key and press the Down Arrow on your keyboard until the perch is in the correct position inside the birdcage. I have converted the perch to an image (Right Click/convert Object Type/From Text Path to Image) and used the Retouch Tools/Burn to add some shading to my perch too. 49. If you are going to put a bird inside the cage you will need to put this in position now. It might be a good idea to save your birdcage in its present form for use in the future anyway! If you have decided to have the bird outside the cage you can Right Click/Select All Objects then Right Click/Merge As Single Object. |
|
|
YOUR CAGE IS FINISHED! Add a feathered friend and any finishing details to your picture and sit back and admire your work! |
 |
|
|
Free Spirit Graphics If you would then like an invitation to join, please Email Me. We'd love to have you along! |
|
|
If you need any help - or want to make suggestions to improve this tutorial - or for new ones |
|


This site © Rosie Hardman-Ixer 2001/2/3 |