
ANIMATED STAR BACKGROUND PI VERSION: 10 (also suitable for PI 8/XL/8.5). LEVEL: Beginner MAIN TOOLS USED: Path Drawing Tool, Animation Gallery, Gif Animator 5 and the Simple Quick Tile Filter - available Here. TERMS OF USE: Please Read - Thank You! |
|
INSTRUCTIONS |
|
|
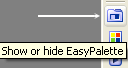
TOOL ICONS FOR BEGINNERS
|
|
|
|
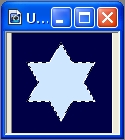
STAR & PART ONE of the ANIMATION 1. Open a new canvas, 100W x 100H pixels with a dark blue background (Hex#000046). 2. Using the Path Drawing Tool, Shape - Six-sided star (PI 8/XL/8.5 - Custom Shape - Star 2): Color - Pale blue (mine is Hex#CEE7FF) or a colour of your choice: Mode - 2D: draw a shape approximately 80W x 80H pixels. 3. Right Click/Align/Center Both.
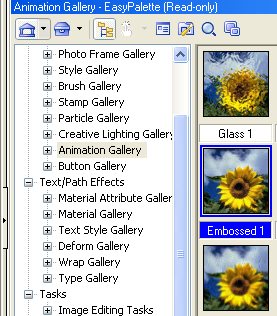
4. Keeping the star ONLY selected, open the EasyPalette/Animation Gallery/Animation Texture, select Embossed 1 in that Gallery, Right Click/Modify Properties and Apply.
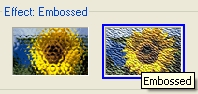
5. In the Texture Filter window that appears, select the Embossed option from the Effect options in the bottom left hand corner as shown left.
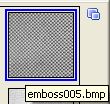
6. Under Parameters (top right of the window) click on the pull-down arrow next to Texture image/Select Texture and select the Emboss005 thumbnail shown left.
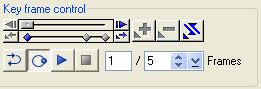
7. Under Key frame control change the number of frames to 5 as shown. At this point you can see what your animation will look like by clicking on the Play button (arrow) if you wish. Click on the Stop button (square) to stop the animation.
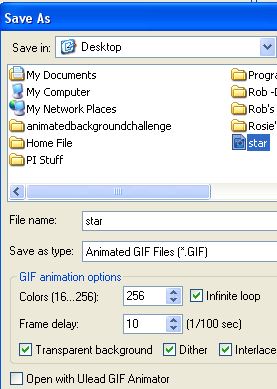
8. Click on the Save button and, using the settings shown left, save your animation as 'star.gif' somewhere you can find it easily.
Settings: 9. Close the Texture Filter Window. Onto Part Two! |
|
|
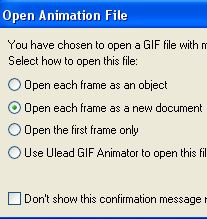
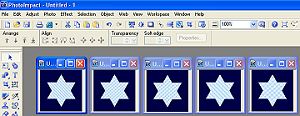
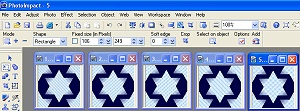
PART TWO of the ANIMATION 10. Back in PI, Right Click/Merge All. 11. Now Duplicate this merged canvas 4 times (either Edit/Duplicate/Base Image Only or Ctrl+D) and line them up across your workspace. 12. Now open the star.gif that you saved, being sure to have Open each frame as a new document' checked. 13. Making sure that you use the star frames in the same order that they came into PI, move a star from each animation frame into one of the line of backgrounds working from left to right, so that you have a star in each one. As you move the stars into the backgrounds, Right Click/Align/Center both - this should put it exactly over the top of the star in the background and then Right Click/Merge. 14. Now close each of the transparent backed frames without saving any changes. You workspace should now look something like the one left. 15. Taking each frame in turn click on Effect/Simple/Quick Tile and Apply. Now click on Web/Image Optimizer and save each frame to a folder on your computer where you can find them easily - numbering them 1.jpg, 2.jpg, 3.jpg etc. 16. You can now close the remaining canvasses in PI without further saving. Almost there now! |
|
|
PART THREE of the ANIMATION 17. Using the Switch button, top right of the PI Screen, open Ulead Gif Animator. 18. In the Startup Wizard that appears, click on Animation Wizard. 19. Enter 100 into both the Width and Height boxes and click on Next. 20. Click on the Add image button. Browse to the folder containing your saved frames. 21. Hold down the Ctrl button on your keyboard and click on each of numbered frames in reverse order from 5 - 1. Click Open. Click Next. 21. In the next box change the Delay time to 12 - this should change the frame rate to 9. Click Next. 22. Click Finish - this should bring your frames into Gif Animator. At this point you can test your animation by clicking on the Play button at the bottom left of the screen if you wish. 23. Click on the Optimize tab - Preset Photo 256 - then click on the Save button and save your animated background to your computer!
|
 |
|
|
Free Spirit Graphics If you would then like an invitation to join, please Email Me. We'd love to have you along! |
|
|
If you need any help - or want to make suggestions to improve this tutorial - or for new ones |
|

 - Easy Palette
This site © Rosie Hardman-Ixer 2001/2/3/4 |